Panel Lines
by Tony Bagley
aka TigreST
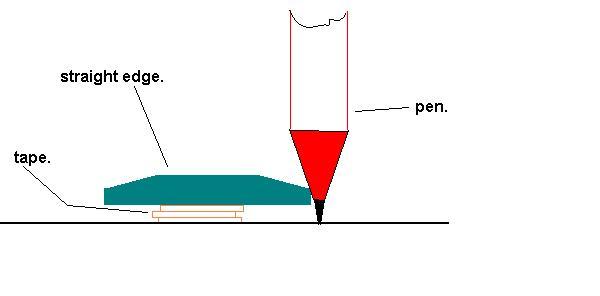
1. Whatever you use for a straight edge pen guide be sure to jack it up off the surface of the wing/fuselage/whatever, before you put the nib of your pen against it's edge.
Why? Depending on the pen used the ink will free flow from the nib and be taken by capillary action underneath the straight edge and smear all over the planes surface along the guide.
How? What I do is take two or three strips of masking tape and run it on the under side of the straight edge device,..but not right up to the edge you plan to use as a guide. You need some "set back" between the tapes edge and the edge of the guide. This slim margin of open space will stop the ink from wicking under your guide and making a mess of your models surface.
2. Layout: If you plan to mimic the panels of the P-51, use existing photos and drawings as a guide. You may wish to scale the lines by doing a "scale up/scale down" kinda thing . If memory serves,..the P-51 has a wing span of 37ft (?) Work a ratio of this span to that of your models wing span, (42 inches?) and this will help you dial in where on the wing the panel lines should more or less go. As you layout the "start" and "stop" points of one line on the left wing, go right over to the right wing and do the same line layout there. This will save in the long run as you will not find yourself re-measuring the same line five times on the other wing surface trying to get it in the same spot. Depending on how detailed you go the measuring can become somewhat involved. It's much easier, IMHO, to measure both visible panels at the same time. You will actually see the panel line effect slowly grow on a larger surface as you progress, which is kinda cool :-)
3. For lines on curved surfaces like over the fuselage top and bottom ( of which there was not many installed on my Tucano I was chicken, ha ha) you may wish to bend thin brass shim stock to fit the curve, apply the lift tape to protect from the "bleed under", then align the brass guide and stroke the line with your pen.
4. Guide removal: When you've stroked the pen across the surface stop and hold the guide for a second or two to allow the ink to set. If you happen to drag the guide over the fresh ink you may again get a smear. Also, wipe the edge of the guide between lines to remove any built up ink, again to reduce the risk of smears. The doped surface is not very absorbent so the ink sits on top some what,..give it a small chance to set.
5. Keep your hands clean of any ink they may pick up from the guides. This residual ink will transfer from you hands to the model in short order.
6. Take your time. Once the process gets going you'll be surprised at how fast you can work a section. If at all possible pick a stopping point for the nights work that is easy to see on both wing panels. Do not stop halfway through a line (as in only do the left wing) ,...complete the same line on the other wing panel and then your all caught up and ready for the next session.
7. How much to do: That is once again the realm of the Mk-108 Eyeball owner and what he/she thinks is or is not "tarted up". Most tend to agree that "less is more", where as "more" is just plan old "more", ha ha.
8. Start and Stop points for lines: During the layout process I used small pieces of tape to help me layout a line. One at the beginning, one at the end. You can use a pencil to very lightly mark the surface of the model to help you do your layout work. I'm talking' extremely light marks with the pencil,..so light you have a hard time seeing them. I'm talking the odd dashed type mark here. With the layout complete and the line installed, go back to the pencil marks and erase them with a extremely light application of the pencil eraser, one of those large soft ones. As I was working over a white base color the slightly scuffed finish of the eraser marks just blended away with the clear coat applications. The tape at the beginning of a line run can also be used as a "jump off point" to start your line. Put the pen on the tape then run off the tape onto the wing surface and out to the end point. Quick motion is needed if you do this due to the fact that ink can wick under the tape (see rule #1) and cause a bleed spot. Do not attempt to run your pen off the end of the line onto the stop point tape marker. This is a sure case for disaster and bleed under. You need to move at a comfortable pace with the pen so as to lay down the same kind of line ever time. Pace will also help you hit those stopping points out in the middle of no where, with out having an over-run.
9. Before you start pick a line which will be the "base line" (pun intended) for all the others lines to grow from. It might be that one panel line that runs from root to tip on the wing. From this line all others will come. From here other measurements will be made to get the rest of the detail in the right spot. On the Tucano, if memory serves, it was the line that ran down the LE of the wings from root to tip. Kinda hard to get it placed, but once done the rest of the lines were easy to dial in from the TE.
10. Tools: All manner of flexible straight edges will work. As an old drafting guy, right?, (again testing the memory here) you no doubt have some of the see through template guides for circles and stuff. These work great,..just jack them up with tape. A couple of mine actually have small dimples that raise them from the surface,..no tape needed here. I also use small squares and tri-squares to help with the layout work. Almost anything can be used as a guide. Someone has made mention of a cheap Flexible ruler on SSW a few weeks back. I've got one of those and it is a nice panel line guide tool. Watch out of what I call "cheat". This is a curved line that can happen due to the taper the wing makes from root to tip and the curve of the airfoil. Sometimes it so slight it can not be noticed. Something to watch for anyway if you lines don't meet at the right corners.
I think I talk to much. Hope this helps if not totally confuses and scares you off panel lines. Don't let that happen. Panel lines do add so much to the model if tastefully done.
Tony
aka TigreST